> For the complete documentation index, see [llms.txt](https://docs.raybot.app/start/llms.txt). Markdown versions of documentation pages are available by appending `.md` to page URLs; this page is available as [Markdown](https://docs.raybot.app/start/getting-started/tips-for-beginners.md).
# Tips for Beginners
### Welcome to RayBot! 🚀
We know that getting started with a new service can feel a bit overwhelming. That’s why we’ve put together some simple tips to help you get comfortable and start making the most of RayBot.
***
### ✨ Getting Started
Tip #1 — Getting Started
Add a few wallets to see how RayBot works right away.\
Use the command:
`/add ADDRESS`
(where `ADDRESS` is the wallet address).\
You can find more details about adding wallets in the [✨Add ](/start/telegram/interface-navigation/add.md)section.
Tip #2 — Fighting Scam Transactions
Most “empty” or suspicious transactions (spam transfers, junk tokens) are already filtered out automatically.
To completely get rid of them, set a minimum transaction amount.\
For example, set a **$50** threshold:
* For Solana — specify the limit in **USD**.
* For EVM / TRON — set the amount in **USD**.
Path:\
`/start → ⚙️ Settings → Token transfers`
This way, you’ll filter out 99% of scams, since such transactions usually carry no real value.
Tip #3 — Setting Up Filters
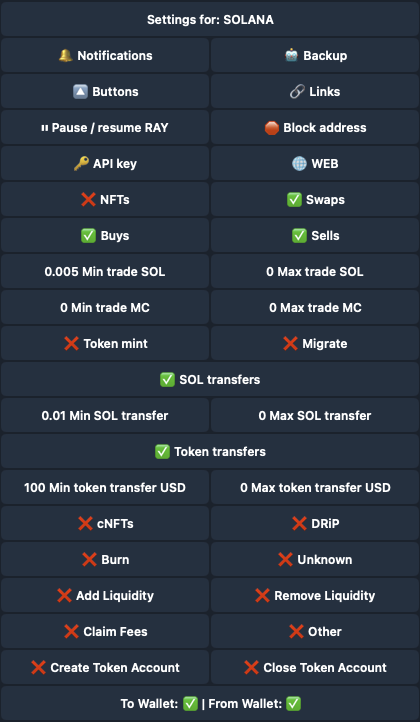
If you only want to track key actions (like buys and sells), turn off secondary notifications:
* ❌ NFTs
* ❌ cNFT
* ❌ Drip
* ❌ Burn
* ❌ Add liquidity
* ❌ Claim fees
* ❌ Create token account
* ❌ Unknown
* ❌ Remove liquidity
* ❌ Other
Path:\
`/start → ⚙️ Settings`
This way, your notifications will stay clean and relevant.
Tip #4 — Customizing Notifications
Not all notifications are equally useful — extra noise can distract you from what really matters.\
In the / [🔔 Notifications ](/start/telegram/interface-navigation/settings.md#notifications)section, you can customize exactly what information appears in your messages.
You can enable/disable:
* wallet address display,
* transaction descriptions (what was bought/sold and for how much),
* PnL, fees, and token balances after a trade,
* token social links, images, and launchpad emojis.
Path:\
`/start → ⚙️ Settings → 🔔 Notifications`
💡 Team Tip:\
If you’re just starting out, keep **Description** and **Token footer** enabled.\
That’s enough to see the important details without information overload.
Tip #5 — Quick Buttons
RayBot supports integration with popular trading bots and services.\
With quick buttons displayed right under notifications, you can react to events without leaving the chat: buy, sell, or open a token in the service you prefer.
What you should know:
* Buttons are activated in **`⚙️ Settings → 🔼 Buttons`**.
* You can enable only the services you actually use — this removes unnecessary clutter.
* Almost all well-known trading bots in Telegram are supported, so your go-to tools are always at hand.
💡 Team Tip:\
Pick 1–2 bots you’re most comfortable with and add them to the buttons. This way, you’ll be able to act as fast as possible without switching between apps.
Tip #6 — Shared Use
RayBot is great not only for individual tracking but also for teamwork. If you trade with friends, colleagues, or manage a community, connect RayBot to your Telegram or Discord groups so everyone can see notifications in one place.
💡 Key Benefits:
* 📢 **Shared access** — everyone receives the same signals and can discuss them right in the chat.
* ⚙️ **Flexible management** — admins can centrally configure filters, wallets, and buttons.
* 💰 **Cost efficiency** — the subscription can be shared among several members, making it much more affordable.
ℹ️ You can find more details about groups and setup in the [👾 Groups](/start/telegram/interface-navigation/groups.md) section.
***
### 📚 Additional Resources
If you’ve already mastered the basics and want to dive deeper into on-chain trading with RayBot, be sure to check out the [💼 **Use Cases**](/start/use-cases/use-cases.md) section.
It was created by experienced traders and includes:
* real examples of using RayBot,
* practical tips and scenarios,
* working strategies for different situations.
💡 We recommend exploring it — it will help you get more out of RayBot.
---
# Agent Instructions
This documentation is published with GitBook. GitBook is the documentation platform designed so that both humans and AI agents can read, navigate, and reason over technical content effectively. Learn more at gitbook.com.
## Querying This Documentation
If you need additional information that is not directly available in this page, you can query the documentation by asking a question.
Perform an HTTP GET request on the following URL with the `ask` and `goal` query parameters:
```
GET https://docs.raybot.app/start/getting-started/tips-for-beginners.md?ask=&goal=
```
`ask` is the immediate question: it should be specific, self-contained, and written in natural language.
`goal` is what the user is ultimately trying to achieve, the reason they need the answer. Sharing it helps GitBook give you a better, more relevant answer. A goal is most helpful when it describes the outcome the user wants rather than restating the question. For example, with `ask=how do I create an API token`, a goal like `automate deployments from our CI pipeline` lets GitBook tailor the answer to that use case.
The response will contain a direct answer to the question and relevant excerpts and sources from the documentation.
Use this mechanism when the answer is not explicitly present in the current page, you need clarification or additional context, or you want to retrieve related documentation sections.